If you’ve ever stood in your backyard, staring at a cluttered shed and wondering where all your gardening tools went, you’re not alone. With the gardening season in full swing, the demand for effective storage solutions has grown. That’s why I created this post—to help you transform your Lifetime shed into a functional and organized space that inspires your green thumb.
If you’re someone who loves gardening, whether you’re a beginner or a seasoned pro, this one’s for you. You probably want to keep your tools, pots, and supplies in one place without the endless search for that missing trowel or pruning shears. I’ve pulled together 11 creative lifetime shed storage ideas that are not only practical but also make your gardening experience more enjoyable.
By exploring these organization tips, you’ll discover how to utilize every inch of your shed. From vertical gardening storage solutions to clever shelving ideas, each suggestion is designed to maximize space and efficiency. You’ll walk away with inspiration and practical steps to create a tidy and productive gardening hub right in your backyard.
Key Takeaways
– Get Organized: Learn how to use vertical space effectively with ideas like vertical planter walls and pegboard tool walls to keep your tools visible and accessible.
– Maximize Storage: Explore ceiling storage solutions to take advantage of overhead space, ensuring your shed stays clutter-free.
– Functional Workspaces: Discover the benefits of a dedicated potting station with storage, where you can pot and repot plants without chaos.
– Mobility Matters: Consider rolling carts for easy access to soil, pots, and tools, allowing you to move your supplies wherever you need them.
– Seasonal Strategies: Implement seasonal storage solutions to rotate your gardening gear throughout the year, making it easy to switch between different gardening tasks.
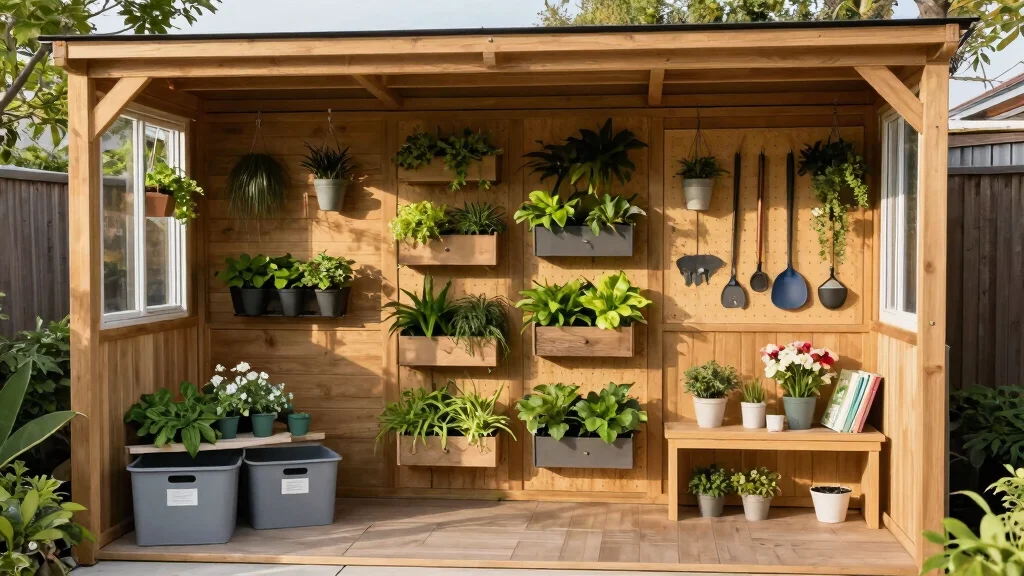
1. Vertical Planter Wall

Looking to save space while adding beauty to your shed? A vertical planter wall is an ideal solution that not only looks fantastic but also allows you to grow fresh herbs, vibrant flowers, or even compact vegetables right inside. You can easily build one with wooden pallets or opt for a ready-made vertical garden kit in various colors and styles to match your shed’s aesthetics.
Start by arranging plants based on their height: taller plants at the top and trailing varieties cascading below create a stunning visual effect. This setup not only beautifies your space but also makes it easy to access fresh herbs for cooking or garnishing.
Key benefits of a vertical planter wall:
– Create a stunning vertical garden feature
– Grow a variety of herbs, flowers, and veggies
– Maximize limited shed space for gardening
With a vertical planter wall, you’ll transform your shed into a charming garden oasis where gardening becomes a delightful experience.
2. Ceiling Storage Solutions

Have you considered utilizing the ceiling space in your shed? It’s a fantastic way to store larger items like inflatable pools or seasonal decorations without cluttering the floor. Installing sturdy shelving or hanging racks allows you to keep your items organized while maximizing your available space.
Choose lightweight bins for easy lifting and access, and make sure to place heavier items on lower shelves for safety. This approach not only declutters your shed but also enhances accessibility to your essential gardening tools and supplies.
Tips for effective ceiling storage:
– Install strong shelving for heavy items
– Use lightweight containers for easy access
– Label bins for quick identification
By making the most of your ceiling space, you’ll create a more organized shed and improve your overall gardening efficiency.
3. Pegboard Tool Wall

A pegboard tool wall is essential for keeping your gardening tools organized and within reach. This versatile storage solution ensures easy access while maintaining a tidy appearance. Simply install a pegboard on one wall, then hang your tools, gloves, and even pots using hooks and shelves.
Feel free to paint the pegboard in a cheerful color to add some personality to your shed. Group similar tools together for easy access, and consider adding small baskets for items like seeds or garden markers to save time during gardening tasks.
Benefits of a pegboard tool wall:
– Keep tools visible and organized
– Customize with color for a personal touch
– Easily rearrange tools as needed
With a pegboard, you’ll streamline your gardening process, making your shed a more efficient workspace.
Did you know a pegboard wall can cut tool-search time by up to 50% once everything has its own hook? With a little color and grouped tools, your lifetime shed storage ideas become a quick grab-and-go routine—gloves, trowels, and seeds right where you expect them.
4. Potting Station with Storage

Imagine having a dedicated potting station designed just for your gardening needs. This area should feature a sturdy table for repotting plants, along with shelves to store pots, soil, and fertilizers conveniently. Adding hooks or small shelves on the wall above will help keep everything organized and within reach.
Consider using clear containers for your soil mixes and fertilizers, allowing you to see your supplies at a glance while keeping them tidy. A well-designed potting station can make your gardening tasks more enjoyable and keep your shed looking sharp.
Key features of a potting station:
– Sturdy table for repotting and working
– Shelves for easy access to supplies
– Clear containers for visibility and organization
With a dedicated potting station, you’ll find gardening becomes a breeze, and your shed will remain clutter-free.
Potting Station with Storage
Editor’s Choice


5. Rolling Cart for Mobility

Mobility is essential in any gardening shed, and a rolling cart can be a game-changer. It allows you to move tools and supplies effortlessly, making your gardening tasks significantly more efficient. You can customize the cart with compartments for different items and even add hooks for frequently used tools.
Select a cart that fits your shed’s dimensions; compact designs work perfectly in smaller spaces. A rolling cart proves especially useful during planting season, enabling you to transport everything you need from the shed to your garden seamlessly.
Benefits of a rolling cart:
– Easy mobility for tools and supplies
– Customize with compartments and hooks
– Perfect for smaller sheds
A rolling cart will enhance your gardening efficiency and keep your shed organized.
Rolling Cart for Mobility
Editor’s Choice


6. Gardening Gear Hangout

Creating a designated area for your gardening gear can greatly improve organization in your shed. By hanging gardening gloves, aprons, and hats, you can ensure everything you need is in one cozy spot. Use hooks, wall-mounted baskets, or a simple coat rack for a tidy and accessible setup.
This makes it easy to grab your gear before heading outside, ensuring you’re always prepared for gardening adventures. Choose fun colors or decorative styles for this area to add a personal touch to your shed.
Key features of a gardening gear hangout:
– Keep gardening gear organized and accessible
– Use hooks and baskets for easy storage
– Add a personal touch with colors or decor
A gardening gear hangout not only adds functionality but also makes your shed feel more inviting.
Did you know that gardeners spend up to 10 minutes a day hunting for gloves and hats? A dedicated Gardening Gear Hangout as part of your lifetime shed storage ideas cuts that time in half, keeping every item in one accessible spot.
Gardening Gear Hangout
Editor’s Choice


7. Herb Drying Rack

If you enjoy harvesting herbs, adding an herb drying rack to your shed is a fantastic idea. This creative solution enhances functionality while utilizing vertical space effectively. You can create a simple hanging rack with twine or opt for a tiered basket system to keep your herbs organized and ready for use.
The delightful aroma of drying herbs will fill your shed, making it a more enjoyable space to work in. Don’t forget to label each herb for easy identification and hang them to allow airflow around them.
Benefits of an herb drying rack:
– Utilize vertical space efficiently
– Keep herbs organized and identifiable
– Create a charming ambiance in your shed
An herb drying rack not only serves its purpose but also adds a rustic charm to your gardening space.
Did you know a small herb-drying rack can reclaim up to 40% of vertical shed space? With a simple hanging twine or tiered baskets, lifetime shed storage ideas stay organized, herbs labeled, and drying aroma turning your shed into a pantry-inspired haven.
8. Clear Storage Bins

For an organized shed, clarity is crucial, and clear storage bins are the perfect solution! These bins allow you to see exactly what’s inside without digging through stacks. Label each bin with its contents, such as ‘seeds,’ ‘bulbs,’ or ‘garden tools,’ for efficient organization.
Stackable bins maximize space, making them ideal for smaller sheds. Choose bins with lids to keep the contents safe from dust and pests, ensuring your supplies remain clean and ready for use.
Advantages of clear storage bins:
– See contents easily without opening bins
– Stackable design saves space
– Lids protect against dust and pests
Clear storage bins will give your shed a neat appearance and help you find what you need quickly.
9. Gardening Bookshelf

If you have a collection of gardening books, why not dedicate a small bookshelf to display your favorites? A bookshelf adds a personal touch while keeping your books within easy reach. Arrange the books by topic or color for a visually appealing setup.
Include a few decorative items, like potted plants or framed pictures, to enhance the cozy atmosphere. Reserve a special spot on the shelf for a notepad to jot down gardening notes or ideas as they come to you.
Benefits of having a gardening bookshelf:
– Showcase your favorite gardening books
– Add decorative elements for a homely feel
– Keep notes handy for inspiration and planning
A gardening bookshelf enhances your shed’s character and encourages you to deepen your gardening knowledge.
Gardening Bookshelf
Editor’s Choice


How To Choose The Right Storage Solutions For Your Lifetime Shed
Choosing the right storage solutions for your lifetime shed can maximize its potential. With so many options available, it’s essential to consider the best features to suit your gardening needs. Here’s how to make the right choices for your shed organization:
1. Size Matters
Before purchasing any storage solution, measure your shed’s interior dimensions. Know how much space you have to work with. This ensures that the storage solutions you choose fit comfortably and do not overcrowd your shed. Consider vertical storage options if floor space is limited.
2. Material Quality
The materials of your storage solutions should withstand outdoor conditions. Look for durable, weather-resistant materials like metal or heavy-duty plastic. These can endure the elements and protect your gardening tools and supplies from rust and decay. Checking product reviews can also help in determining the longevity of the material.
3. Functional Features
Think about what features will make your storage solutions more functional. Do you need shelves, hooks, or bins? Pegboards are great for hanging tools, while rolling carts make it easy to move items around. Choose features that align with how you plan to store and access your items, making your gardening work more efficient.
4. Budget Considerations
Set a budget before you start shopping. Storage solutions come in a wide price range, so it’s important to know what you can afford. Consider quality over quantity; investing in a few high-quality items will pay off in the long run. Check for sales or second-hand options that can fit within your budget without compromising on quality.
5. Aesthetic Appeal
Your shed should be a pleasant space to work in. Choose storage solutions that complement your shed’s design. You can opt for wooden shelves or colorful bins that add flair to the shed. This not only keeps your items organized but also makes your shed a more inviting place to spend time.
6. Flexibility and Mobility
Consider solutions that offer flexibility. For instance, rolling carts allow you to easily rearrange items based on seasonal needs. If you frequently change your gardening tools or supplies, storage that adapts to your needs helps keep your shed organized.
Pro Tip: Before making a purchase, visualize how each item will fit in your shed. Use sticky notes to mark potential storage spots and see how different items work together. This can prevent clutter and enhance your shed’s organization.
10. Seasonal Storage Solutions

Transform your shed storage according to the seasons! Adapting your storage to match gardening tasks throughout the year keeps everything organized and accessible. Create designated areas for seasonal tools and supplies, ensuring your shed is always ready for the current gardening needs.
In winter, store away summer gear to make room for essentials like shovels or snowmelt. Using color-coded bins or labels can help you quickly identify seasonal items, making transitions smoother.
Key tips for seasonal storage:
– Designate areas for seasonal tools
– Use color-coded bins for easy identification
– Rotate supplies with changing seasons
Seasonal storage keeps your shed organized and helps you stay focused on your gardening tasks year-round.
11. Creative Shed Layout

Lastly, think about your shed’s overall layout to maximize efficiency. A creative arrangement means positioning tools and supplies in a way that complements your workflow. Ensure frequently used items are easy to reach while storing less-used items out of the way.
Consider establishing ‘zones’ for different activities, such as potting, tool access, and general storage. Regularly reassess your layout to ensure it meets your evolving needs for better organization.
Benefits of a creative shed layout:
– Enhance accessibility for frequently used items
– Create designated areas for specific tasks
– Regular updates improve overall organization
A thoughtful layout will transform your shed into a functional workspace, enriching your gardening experience.
Creative Shed Layout
Editor’s Choice


Conclusion

Transforming your lifetime shed into a functional gardening hub doesn’t need to be overwhelming.
These 11 vertical gardening storage solutions provide a perfect blend of organization and style, making your shed not just a storage space but an inspiring place for your gardening projects.
By implementing these ideas, you’ll find gardening becomes a more enjoyable and efficient task.
Note: We aim to provide accurate product links, but some may occasionally expire or become unavailable. If this happens, please search directly on Amazon for the product or a suitable alternative.
This post contains Amazon affiliate links, meaning we may earn a small commission if you purchase through our links, at no extra cost to you.
Frequently Asked Questions
What are the best lifetime shed storage ideas to maximize vertical space in my shed?
To implement lifetime shed storage ideas, start with vertical strategy: install wall-mounted pegboards and a heavy-duty rail system with adjustable hooks for shovels, rakes, and trowels. Add multi-tier shelves along the walls and a ceiling-mounted rack for seasonal items to keep floor space clear. Choose outdoor storage solutions that resist moisture, like powder-coated steel or durable resin bins, and dedicate a gardening tools storage zone near the door for easy access. Finish with clear labels and a creative shed layouts approach to maintain shed organization tips across the year.
How can I optimize gardening tools storage in a lifetime shed for quick access?
Start by zoning your space: separate soil-digging gear from pruning tools, and keep frequently used items within arm’s reach. Install a pegboard with standardized hooks and a rail system so you can move hooks as needed. Use labeled clear bins for smaller tools and a magnetic strip for metal implements. Keep a small maintenance station with oil and rags for quick care, and apply shed organization tips to keep everything neat. These steps boost gardening tools storage efficiency in your lifetime shed.
What shed layouts work best for small backyard ideas to boost efficiency?
Think in zones: place a compact L-shaped workbench in a corner, tall shelving along one wall, and leave a clear central area for movement. Use a fold-down work surface or wall-mounted drops when extra space is needed, turning tight corners into functional storage. Add vertical storage like tall cabinets or planters on the far wall to free floor space. This approach reflects creative shed layouts and helps maximize backyard shed ideas.
Which outdoor storage solutions are best for seasonal items in a lifetime shed?
Opt for weatherproof, stackable totes with clear labels so you can see seasonal items at a glance. Use transparent containers for quick identification and sealable bins to protect items from moisture. Consider ceiling or high-wall storage for seasonal gear to keep the floor open for daily use. Pair these with a simple labeling system to reinforce outdoor storage solutions and make lifetime shed storage ideas practical year after year.
How can I maintain long-term organization and prevent clutter in a lifetime shed?
Set a regular maintenance routine, like a quarterly quick audit of what you actually use. Keep an up-to-date inventory list and color-code labels so you know where everything belongs at a glance. Create a designated donation or trash bin to curb clutter, and re-evaluate your layouts as needs evolve to preserve shed organization tips and ensure your space remains efficient for backyard shed ideas and creative shed layouts.
![9 Clever Ways to Repurpose Gas Grill Concepts [DIY Guide]](https://edificatum.com/wp-content/uploads/2026/04/9-Clever-Ways-to-Repurpose-Gas-Grill-Concepts-DIY-Guide-150x150.webp)